So, being a family that lives on the outskirts of Santa Rosa bordering Sonoma and the Napa Valley Wine Country, my Dad had decided that he wanted to build a wine barrel smoker. He contacted a local winery and procured himself a nice Cabernet Sauvignon wine barrel. If my memory serves, the very following weekend he got to work on the project, sanding, drilling and screwing in each of the staves to each of the steel bands and creating the access door on the bottom to tend the heating source during smoking. I was not involved in the project at that point so I don't have any pictures from that portion of the process. If you head over to
Christopher King's Blog you can follow his account of these steps, the results were similar so the process I am sure was the same. From this point, the barrel sat for some time in my Dad's garage and then the holiday's came around when, as a surprise, my Mom bought Dad a full-sized Traeger Smoker and the barrel project instantly became moot. Dad quickly fell in love with his Traeger and had decided to give me the barrel to have and to finish, this is my account of the project to completion.
First, since this project was not my idea I really knew nothing about wine barrel smokers and needed to school myself before moving forward. I spent a couple weeks here and there looking at different sources on the internet, learning about all kinds of different smokers, how they work, the processes and options available as well as accounts of others specific wine barrel smoker projects. As I mentioned above, I found
Christopher King's Blog to be the most helpful and, as you can see from the exchanges we shared on the bottom of his post, he is a nice guy that provided a lot of useful answers to my questions and direction for me to head off in... I strongly you suggest you do your own research on these topics and definitely check out Christopher's blog as well.
So my project begins...
My first order of business was to get the top off this thing to see what I was working with... I used a meter stick as a guide and rested it against the steel band just above my cut to mark a guide line all the way around. I used a small Dremel cutting bit to make a 1/4" slit just large enough to insert the blade from a jigsaw. Then I went nice and slow as the staves are under a bit of pressure and can "snap" a bit when cutting through and transitioning from one to the next. People cut their lids at different heights... I found this to be right for me as my lid is not too heavy and I still have some height available to smoke some larger items, turkey, etc if I decide to. The smell inside is amazing... I am not even a huge wine guy but I still love it.

After I got the lid off, it was time to stain and treat the wood. You can pretty much use whatever you want for the outside of the barrel. Found a site on the internet that sells wine barrel smokers that seems to be pretty well made and they use polyurethane to preserve the outside from the elements, so I thought that was a safe bet and decided to go that route. I personally used an all-in-one stain with polyurethane that is both in one application. I applied 2 coats, each needing to cure for 6 hours before I was able to proceed to the next step. For the inside (yes I decided to treat the inside as well) I used Seal-Once Waterproof Wood Protector. It is non-toxic, has no VOC’s, is safe for the environment, protects against mold & Mildew, is water-based, odorless, non-flammable, non-combustible and will help keep the wood from expanding and contracting as much over the years making my barrel last longer (in theory). For those of you who are curious, this product did not effect the great wine smell on the inside once it cured. This product I let cure for 24 hours until moving onto the next step.
The base...
While my base and lid were curing I built this base for my barrel to sit in. I didn't want to screw caster wheels directly into the bottom of my barrel for a few different reasons. First, you don't have as wide of a stance on the bottom of the barrel so if you have an aggregate patio as I do and hit a rock or something the barrel can easily tip. Second I don't like the look as much (but this is personal preference). Third, I prefer to screw as few things as possible to my barrel for structural and longevity purposes. Lastly, I wanted to get the barrel a little higher off the ground to make it easier to work with, especially with regard to the access door and gas control valve on the bottom.
I used metal caster wheels. These barrels are heavy and if you live in warm weather, like me, rubber or plastic wheels can deform and flatten when sitting for long periods of time.
Back together again...
Time to get the lid attached. I went with the largest hinge my local hardware store had. Since the contour of the barrel limits you to one hinge point, and because the lid is pretty heavy, I decided to reinforce the area beneath the hinge to make sure it was solid and would last the life of the barrel... otherwise I would be concerned about prolonged use with only 2 staves supporting that much weight.
I would suggest going this route as well if you are considering different options... some guys put a handle on the top of the lid and lift the lid off like a Weber charcoal grill. This is fine but not ideal as the lid will not seat right unless you set it back on exactly the way it was originally before you cut it from the base with the staves lined up exactly right.
I then added chains so that I can simply lift the lid and have it rest there without flipping all the way over. If it ever slipped you would put a nice little dent/knick in your beautiful work of art. This also makes it very easy when handling food and you are by yourself. You can simply lift the lid in one hand while having a platter of your 'to be smoked' items in the other.
No matter how perfectly you cut the barrel, line it up, reinforce and mount the hinge, there will be a little bit of play in your lid when lifting and lowering your lid. NOTE - You can skip this step if you think it is overkill and don't like the idea or the look of it as it is admittedly not necessary. However, I personally don't think it looks that bad and prefer the benefit of the function of ensuring my lid seats properly without effort. This step helps ensure I get the best seal possible for smoke quality purposes so I went ahead and installed this guide fashioned from steel bands.

Because of the curve of the barrel this guide forces the lid to seat properly every time I lower the lid... this was a very easy and very simple fix to an admittedly small problem, but it was worth it to me. If you don't use some sort of guide then when you lower your lid you will simply have to look down at where the staves are lining up and slide the lid to the left or right until they are straight so you know your seal is good. Take it or leave this solution to avoid that. :)
Last step to finish off the lid was installing the handle. I put the handle in the vice and bend it a bit so that it not only matched the contour of the barrel, but also made its screw points sit in between the stave screws that were already in place.
In hindsight... I should have backed out the two closest screws to where my handle was to be fastened and then simply bent the handle to match those holes and then reinserted them so it resulted in a slightly cleaner look.
Finally, let's start putting the soul into this thing...
I took Christopher's recommendation from his blog and decided to go with the Afterburner V-Burner from
www.gassmoker.com. Good company and they get your unit to you fast, I think mine arrived 5 days after I placed my order via their website. Their standard unit is for use with a propane tank. I already have a plumbed natural gas line on my patio for my Weber gas grill, so I ordered the natural gas version of the V-Burner.
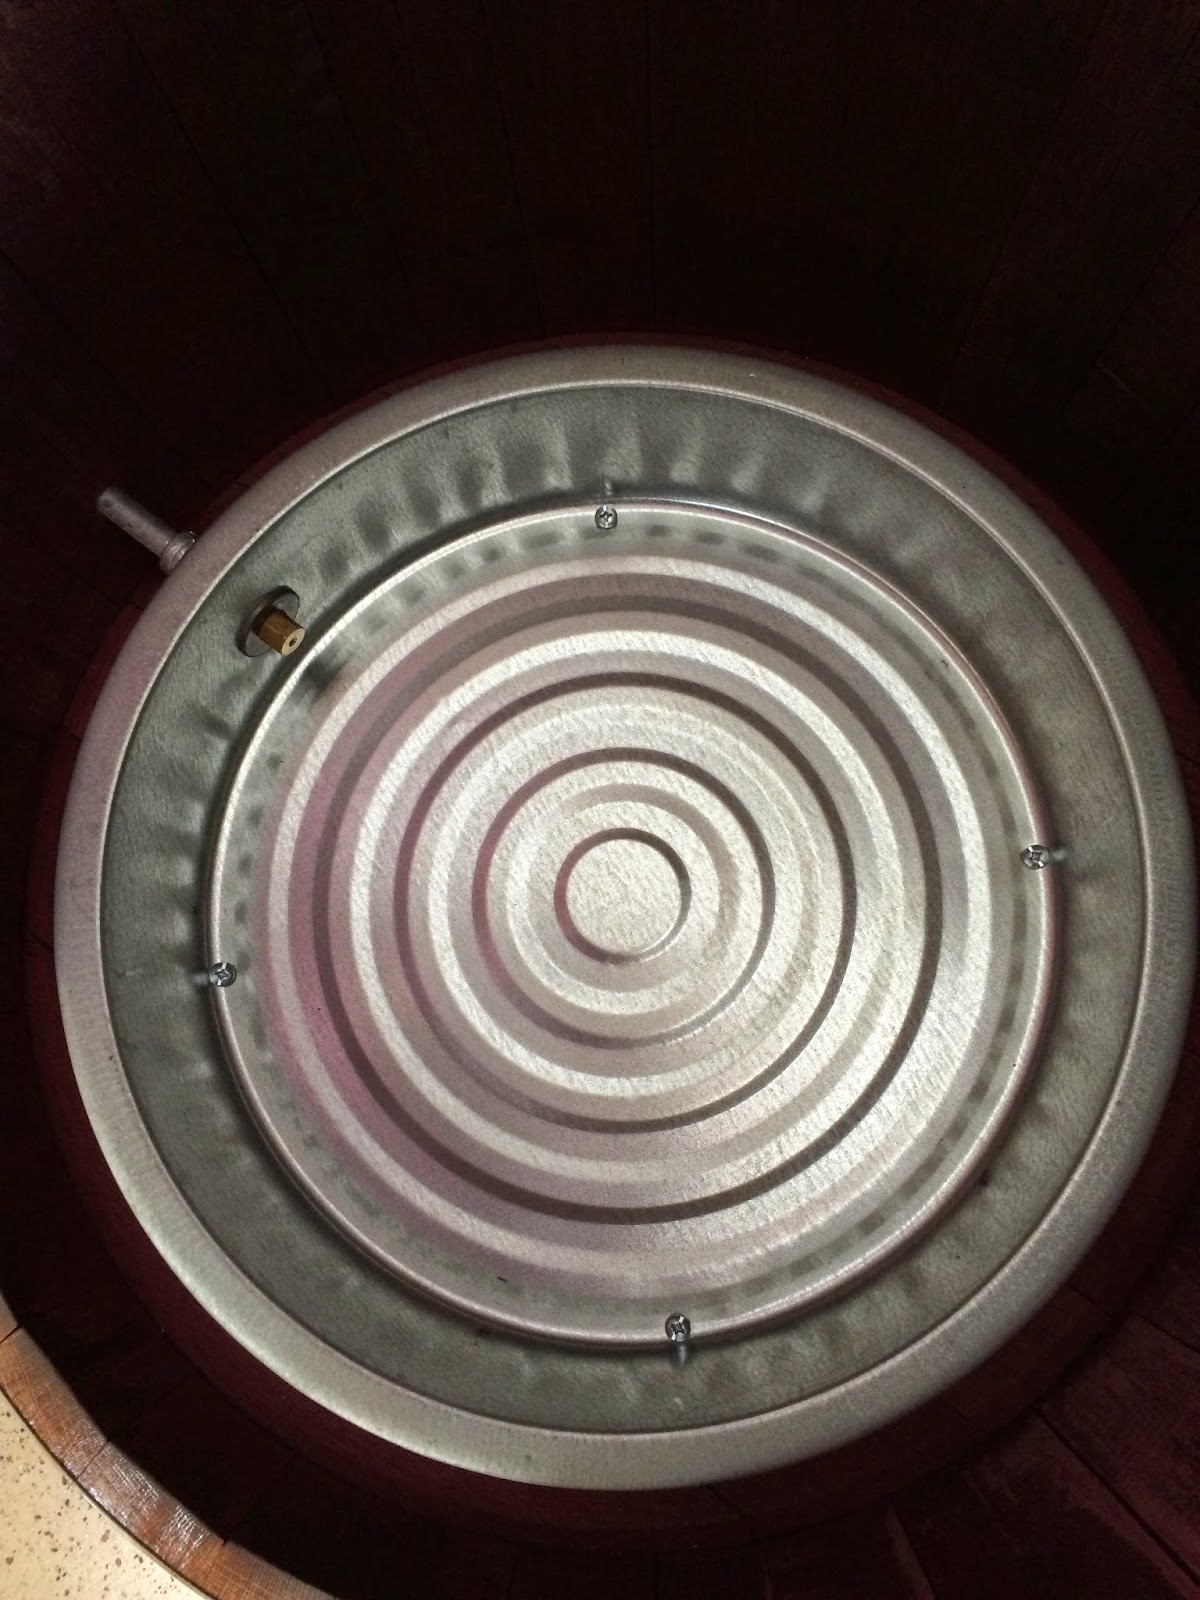
Even though I have no doubts that it would be perfectly safe at smoking temperatures, I did not want the V-Burner pan sitting directly on the bottom of the smoker so I placed a 10 1/2" Weber charcoal grate on the bottom of the barrel for the V-Burner pan to sit on to insulate the bottom of the barrel from the heat a bit.
The V-Burner pan went in next and I centered it in place and drilled four fastener screw holes.
Next I fastened the pan in place to secure everything. I did modify the V-Burner pan slightly to make it work for this barrel smoker application. The V-Burner arrived with a 1 inch 1/4" pipe coming out of the pan with a basic control valve screwed onto it. I removed this valve and added a 1/4" female to 1/4" female threaded connector and then a 4 inch 1/4" extender threaded at each end so that when I set the pan centered in the bottom of the barrel the end of the 4" pipe would protrude out a hole I drilled in the side of the barrel for this purpose.
I ditched the stock valve that came with the V-Burner and bought a higher quality valve that will give me a bit more control over the gas flow and added that to the protruding portion of pipe from the V-Burner inside the barrel.
Next I added standard quick connect fittings. As I mentioned before, I have a natural gas line plumbed into the back yard that my Weber gas grill is hooked to. I added the appropriate quick connect fittings to the line from my house and my Weber grill so that whenever I want to smoke something I can simply unplug my grill and plug in my smoker. At some point in the future, I will likely have a T-line installed so I can have both my smoker and Weber grill plugged in at the same time... if that happens then I will have dedicated lines for each and I will remove the quick connectors and screw the lines to each unit.
The V-Burner that sits inside the pan I installed above has an air intake which I will show below. It comes from the manufacturer set to 300ft altitude. Since the bunghole is something that needed to be addressed anyways, I decided to use it to feed the V-Burner intake with clean air from the outside of the barrel. I used 3/4" parts to make my air intake...
I used 2 identical floor flanges (one for the outside and one for the inside), high temperature caulking, and 4 sets of stainless steal hardware to seal the bunghole as shown in the picture to the left and the one below.
Here is what it looks like from the inside.
On the outside I built this intake mount so that I could easily control the amount of air coming in from the outside.
I found this air intake idea from a
YouTube Video a guy posted about his wine barrel smoker. All I did was put the cap on the pipe and drill a big hols all the way through out the opposite end.
Then, as you can see from this picture and the link I provided to the source YouTube video, simply by turning the cap from right to left you can limit or increase the size of the opening controlling the amount of air being pulled inside the barrel.
NOTE: I am going to purchase one more of the drawer handles from the dampers I used in the smoke stacks below and install in on the top of this cap. I might have another idea to improve this design as well but need to think it over a bit more. Whatever I end up doing I will update this blog with.
It kind of adds a bit of a visual flourish from the outside as well. :)
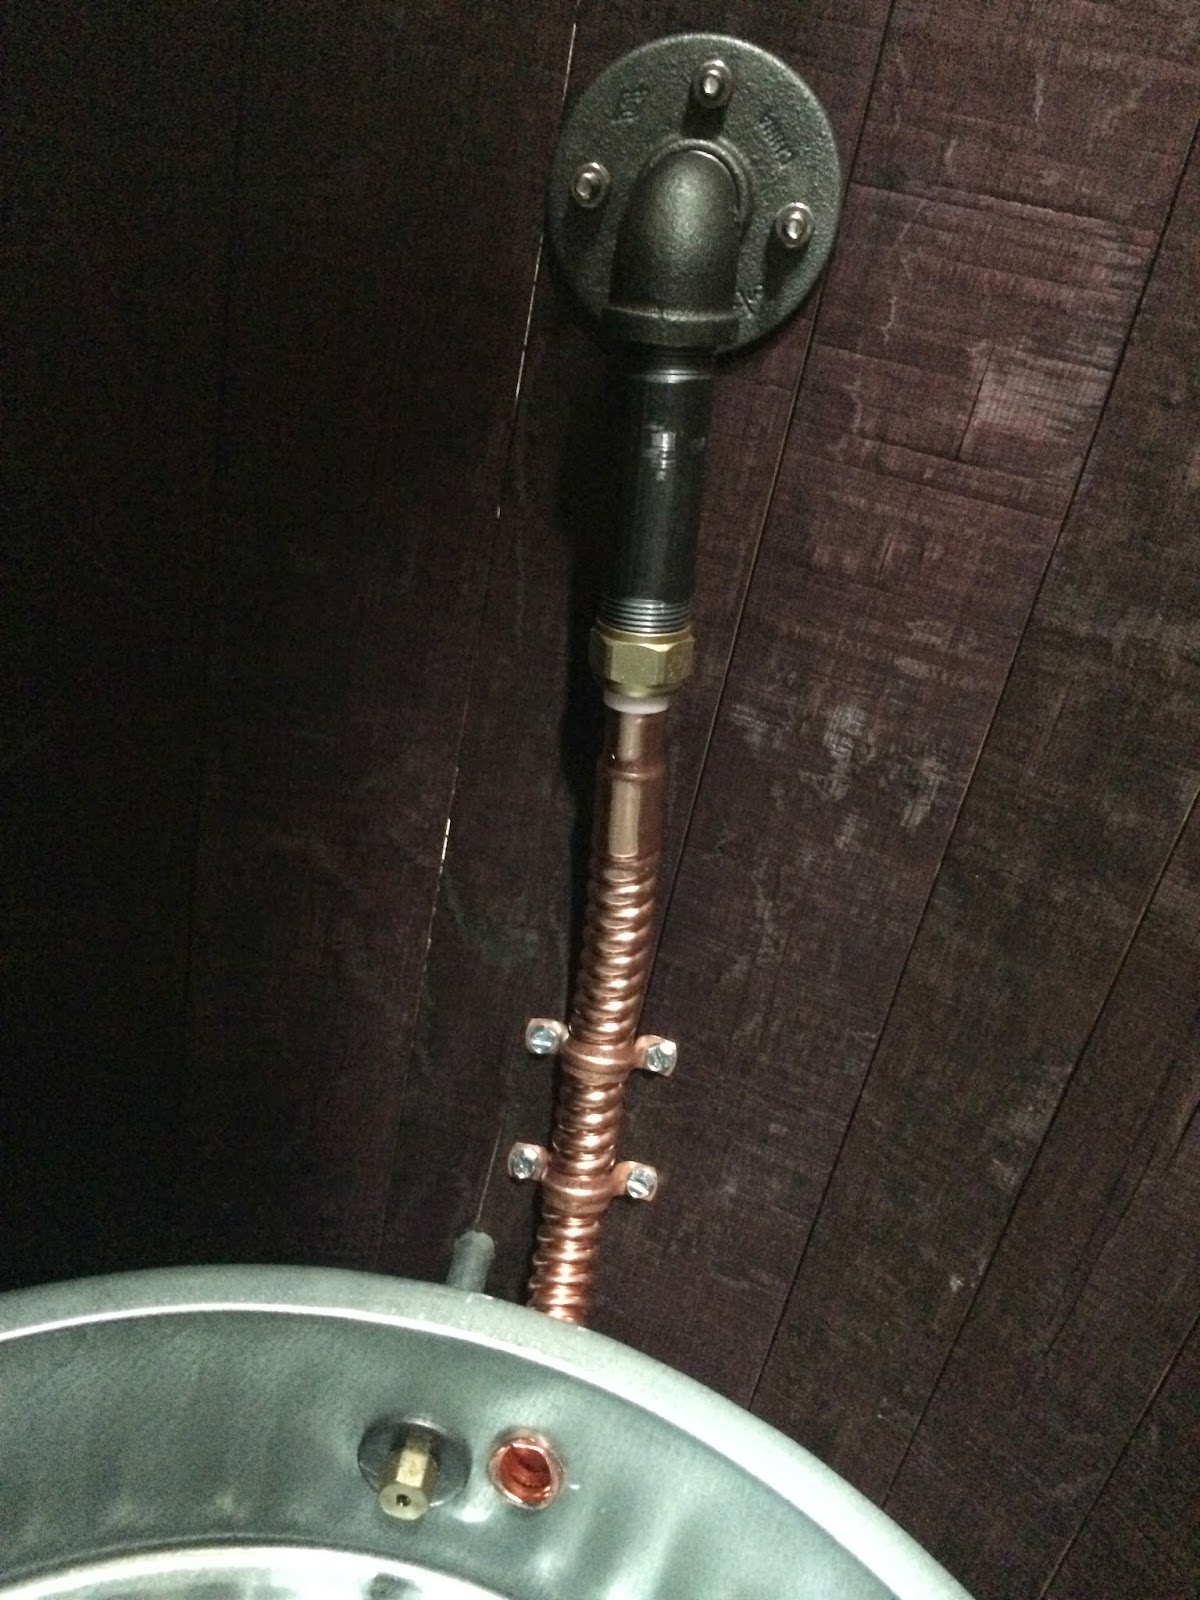
For the inside I used these parts to build a directed air intake. I did not know how smokey it would get at which levels of the smoker, so I wanted to make sure the air being pulled from outside the barrel was going right into the V-Burner intake and not filling the inside of the barrel which would affect the smoke/air ratio which, in turn, would impact my smoke flavor.
Here is another angle to see what I did... again, hindsight... going back to do it again I would have purchased a longer copper hose that would have reached all the way to the elbow joint to make it a bit cleaner. I know it doesn't matter at all as both will function the same... but I would do it that way if I was building another one.
Here is the V-Burner installed, it just slides and sets into place.
The two arrows by the intake is where a small metal slide is that can be
used to set elevation. As I said above, this is set from the manufacturer at 300ft, I chose not to mess with it at all. My intake from outside the barrel terminates right by the opening by design so there is no wasted air being pulled in.
Then I used a large Weber charcoal grate (19" I believe?) on the V-Burner to put my skillet on that will hold my smoke wood.
When the door is open, here is the view of the access to the V-Burner
and skillet. As you can see, there is plenty of room to light the
burner and manipulate the smoke materials.
Temperature gauge...

So, I went with this thermometer because I thought it looked the best
and it had really good ratings on the website I purchased it from. It
is called the BBQ/Smoker Thermometer from Tel-Tru.
NOTE: When you purchase most BBQ/Smoker thermometers, almost all of them
have threads on them. They will be sold with an upgrade option for an
additional hardware mounting kit that is usually $12 or so. You do not
need the extra mounting hardware if you buy a threaded thermometer.
When you install it you can simply drill a slightly smaller hole than
the threads and screw the thermometer directly into the side of your
barrel and get a perfect seal.
Get the largest length thermometer stem you can because you want the
thermometer pulling its temperature reading from as close to the center
of the barrel as possible.
I went with 6" because it gets me close enough and also does not stick out so far as to get in the way of me reaching down below it for cleaning and installation and removal of additional cooking surfaces or the water/drip pan.
Water pan/drip pan...

I have seen most guys using 2 separate pans/bowls here, one for drippingsand another for water to add moisture inside the barrel. Another idea I saw on Christopher's blog was to use one paela pan for both purposes, less stuff to deal with and less mess. I decided to go with a large wok for my water/drip pan. It is big enough to catch all the drippings from whatever I cook above and deep enough to have all the water I need to last a whole smoke.

These are the brackets I made for the wok, I went with 4 so it seats securely and I don't end up with any accidental messes.

And here it is in place...
Something to put the food on...
So I made these brackets to hold my cooking surface... there are a
million different kinds that you can make/buy that will work just fine.
I have seen guys just buy the 90 degree metal brackets or eyelet bolts
for this. I decided to go this route because it was easy, looked fine,
and made it so the cooking surface does not slide around once inserted.
I can clean the cooking grate with a BBQ scraper when done cooking if I
wanted to and it stays in place.

I went with 4 brackets for support here as well.
Time to add some personality...
I wanted some cool exhaust on this thing to really give it some character and personality. I wanted two (for no reason I can justify) and for them to be sizable. But they also go with the rest of the smoker and not stand out too much. I had originally wanted to go with motorcycle exhaust or a stack from a semi. But after considering those options I realized that having my whole smoker look as it does, having giant chrome pipes coming out the top wouldn't look right and the stack wouldn't look like they belonged on my smoker.
I finally found a local exhaust and muffler shop that I purchased a U shaped 3" pipe from. I had them cut that one pipe into the two sections you see here. I wanted the angle to keep any rainfall out while also not hindering any smoke flow.
Because I decided to go with such large stacks for the size of my unit I had to install baffles/dampeners to make sure, if needed, that I could control the outflow of smoke and heat from the barrel. I started by drilling a hole all the way through each pipe.
Then I put the pipes where I wanted them and scribed an outline.
I started with several holes using the biggest drill bit I had to remove the majority of the material.
Then I moved on to my Dremel with a sanding bit and just removed the remainder until I had smooth holes that the pipes fit very snugly into.
Then I sanded both the top, bottom and inside of the holes to make them nice and clean.
Then the pipes were put it place and turned to the right orientation I wanted them in.
Then the pipes were fastened into place with 3 screws each.
I went to the hardware store to the drawer and cabinet section and found knobs that I thought would go well with the barrel to use for outside control of the internal baffle/dampeners I made.
Here you can see my baffle/dampener design... relatively rudimentary but they do work. I orientated them with the handles on the outside so I can tell the internal orientation of the baffle/dampers just by looking at the knobs.
And here she is...
I put one more final coat of stain/polyurethane after all was said and done just to seal up everything real good which really darkened up the tone and made it a lot more rich and vibrant... I was surprised the final coat made such a difference.